2023/04/28 (Friday)
- Lab in-personnel: Himangshu, Zach
| Status | Run 78 Preparation. Tower Installation complete. IVC closed, turbo pumping overnight |
|---|---|
| 1230 | We kept the camera on the turbo to take snapshots every 2 minutes. The summarized plot is shown below |
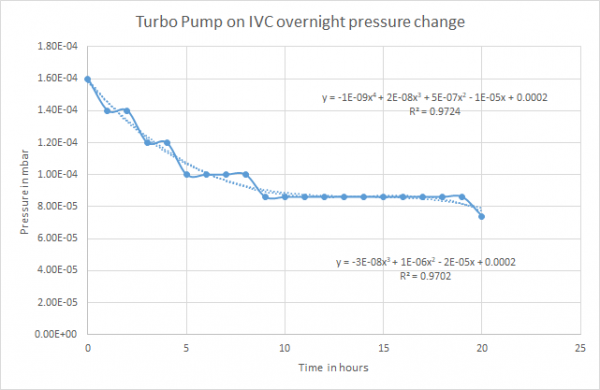
| During Run 76, Turbo on IVC was 86 nbar, with turbo valved out for a minute, IVC was 1 ubar | |
| 1236 | Turbo on IVC = 74 nbar, with turbo valved out for a minute, IVC= 1.4 ubar |
| 1318 | Check contents of warm LN2 Trap 1: 11.1 on G1. Pump it out with the scroll pump. |
|---|---|
| 1323 | G1 = 2.1 mbar and stable, stop pumping on Trap 1 |
| 1323 | Check contents of warm LN2 Trap 2: 2.1 on G1. Pump it out with the scroll pump. |
| 1328 | G1 = 1.4 mbar and stable, stop pumping on Trap 2 |
| 1330 | Insert cold trap 1 into and begin filling the LN2 cold trap dewar with LN2 |
| 1335 | Raise Main bath |
| 1338 | Begin cryocleaning mixture through cold trap 1 following the procedure in procedure:cryoclean_mixture |
| 1345 | Begin installing bolts for main bath, starting with the 2 large, then medium, then small |
| 1347 | Open V6 to 11.9% to restart flow |
| 1354 | Open V6 to 12.1% to restart flow, then reduce to 12.0% |
| 1430 | Had difficulties with some small screws (the ones near the GHS side) We loosened all screws and released tension in the cables enough so that the main bath could wiggle somewhat, this let us install the small screws hand tight, then we installed the medium screws hand tight, then finished tightening the small screws |
| 1440 | Open V6 to 12.2% to restart flow |
| 1445 | End cryocleaning mixture through trap 1. Pump mixture to dump |
| 1502 | P1 = 0.090 mbar, G1 = 1.8 mbar and stable. Close all valves and turn off 3He pump, leaving 714.5 mbar in dump |
| 1505 | Remove cold trap 1 from the LN2 bath to warm up overnight |
| 1642 |
|---|
Install the two largest fridge screws on top of the fridge by hand. It will be slightly difficult to align the main bath holes and the holes on the platform, so you may have to rotate the main bath a bit to get both screws to enter properly (they should not be difficult to get in). Alternate between the screws as you tighten them and don't tighten them completely. Install medium-sized fridge screws by hand. Turn the screw in as much as possible (hand-tight). Ideally the screws will be close to being flush to the top of the dewar. Install the small O-ring screws by hand. Again, there will be some difficulty because not all of the screw holes will be aligned with the platform holes right away. You may be able to shift the apparatus on top of the fridge to help align the holes for the O-ring screws. To do so, use a screwdriver to loosen some of the metal fastenings. Once all of the O-ring screws are in, tighten the large fridge screws completely. You will need to use the allen key to do this. Completely tighten the medium-sized fridge screws with the allen key. Completely tighten the O-ring screws with the allen key. |
| 1505 | Pump out fridge lines: |
|---|
- Make sure mixture is isolated in the dump.
- Check fridge pressures by opening condenser speedivalve+V1 and still gate valve: LHe trap+Condenser(G1)/Still(P1) = 5.6/0.103 mbar.
- Connect scroll pump to He-4 pump line, turn it on.
- Open pump line valve, V5A, V2A, V7, V2, wait a minute, then open V3.
- You're now pumping on the fridge lines. Wait until P1 and G1 flatten out.
- Close condenser speedivalve and still gate valve, V1, V3, V2, V7, V2A, V5A and close and turn off the scroll pump.