−Table of Contents
Updated Plastic Scintillator Fabrication Procedure
This is an overview and summery of everything we need to know to synthesize and polymerize the non-gadolinium loaded plastic scintillators currently fabricated by Jake Brutman (brutm003@umn.edu) in Chemistry. These plans are for a ~20g polystyrene plastic scintillator doped with 0.1 wt% PPO and 0.01 wt% POPOP fluorescent dyes by weight. The polymerization catalyst benzoyl peroxide is used in 0.8 wt%.
Materials List
Chemicals
- styrene (found in fridge in Lab 484 or in chem stockroom)
- alumina (more than 2 mL for every 20g styrene)
- PPO (1% of styrene by weight)
- POPOP (0.1% of styrene by weight)
- purified benzoyl peroxide (0.8% of styrene by weight)
Chemistry Stockroom Supplies
- large syringe
- vial with teflon cap
- cotton
- pipette and bulb
- weight boats / paper
- metal and plastic scoops
- ring stand
- ring clamp
- rubber tubing
- small syringes (NO LUBRICANT)
- large beaker for water bath
- balloons
Lab Safety Requirements
- lab glasses
- lab coats
- polyethylene glove liners
- secondary containment
- Solid waste container
- Liquid waste containers
- NOTE: Before we can start working with wet chemistry in our lab, there are a couple safety courses required by DEHS.
Large / Expensive Equipment
- analytical balance
- sonicator
- laboratory refrigerator
- water traps for nitrogen line
Instructions to fabricate plastic scintillators
Notes :
When performing this procedure, polyethylene glove liners must be worn under the purple nitrile gloves to protect hands from styrene.
1. Purify Styrene
In order to remove excess water from the styrene, it needs to be purified with alumina. When not in use, the styrene should be kept in a refrigerator (Lab 488). Before it can be purified, it needs to warm up to room temperature. Remove from refrigerator at least 1 hour before beginning procedure.
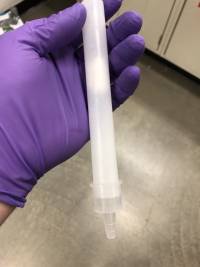
Alumina should be placed into a large syringe that has cotton (2 balls) in the tip to prevent the alumina from falling into the purified styrene. For every 10 mL of styrene, there should be at least 1 mL of alumina in the column. Sometimes, instead of syringes, plastic drying tubes (plastic, removable hose barb on one end, are used).
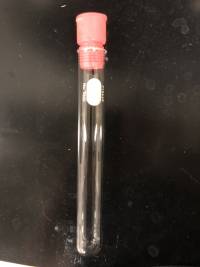
| Small vials | Large test tubes with cap |
|---|---|
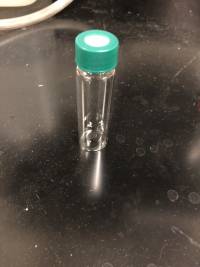 |  |
Small scintillator batches: With the cap-less vial placed beneath the syringe, slowly pipette the styrene over the alumina making sure not to overflow the syringe. Allow the styrene to run through the alumina into the vial until the vial is about halfway full. This should be about 20g of styrene.
Large scintillator batches: Use several drying tubes or plastic syringes to hold alumina. Place these over a large glass funnel, which should feed into a 500mL Erlenmeyer flask.
| Drying tube to use for styrene column |
|---|
 |
The used alumina should turn yellow. After the alumina has dried out it may be put into solid waste. It should take 2 to 3 days for the alumina to dry.
2. Add fluorescent dyes and catalyst to styrene
When adding the fluors and the catalyst, in order to get an accurate measure of the amount added, the vial containing the styrene should be weighted before and after addition as well as weighing out the amount to be added. The PPO is a white powder and should be added at 1 wt%. It should dissolve easily in the styrene. The POPOP appears fluffy and should be added at 0.1 wt%. Because it is much less dense than the PPO, the amount added will look similar to the amount of PPO added. The POPOP is much harder to dissolve, and so will require sonication in a later step. The benzoyl peroxide should be added with 0.8 wt%. The benzoyl peroxide requires a plastic scoop as it will oxidize a metal scoop. The benzoyl peroxide should be purified (see instructions), and after purification, the vial containing the benzoyl peroxide needs to be wrapped in aluminum foil to block out light.
After all chemicals have been added to the styrene, the mixture should be sonicated for about 10-15 minutes (found in lab 488). If making large scintillators, transfer the desired amounts of fluors solution to vials, recording the mass added.
At this point, any dopant should be added to the vials.
If using the vials with the green cap with teflon, wrap electrical tape around the outside of the cap to form a seal with the vial. If using the Pyrex large test tubes with red beaker caps through which needles can be inserted, pull down the edges of the red caps and seal them to the test tube with electrical tape.
If a dopant is added, the vials should be sonicated again for up to 60 minutes.
3. De-Gas styrene mixture
The cap of the vial contains a teflon piece that will allow a syringe needle to pass through without letting air in. The cap should be taped to the vial with electrical tape to make a secure, airtight connection. The rubber tubing should connect the nitrogen gas to a metal connection, to which a needle can be attached. Choose the appropriate needle length depending on the vial. The hose should go through a trap of some sort to remove water from the gas. The needle connected to the nitrogen should be pushed through the cap down into the bottom of the styrene mixture.
Connect needles to the end of the hoses. If using fewer than four vials, connect the bent needles to the unused hose lines to block nitrogen flow.
Bubbles will not form until a second needle is pushed through the teflon into the air above the styrene mixture. The mixture should be allowed to bubble for 30 minutes to an hour.
If an over-pressurized system is required without bubbles, a balloon may be placed over the exit needle. After the balloon has filled with some nitrogen, the needle connected to the nitrogen system may be removed from the vial. The balloon should keep the system consistently over-pressurized.
4. Allow styrene to polymerize
The balloon system mentioned above may be used to keep positive pressure on the vial while heating. The styrene mixture should set for 4 to 5 days in a heat bath of 57-60°C.
Pour any styrene waste into the styrene waste container. Other solvents (methanol, chloroform, etc.) should be placed in the solvents waste container. Place any solid waste (alumina) in the white solid waste bucket.
Water bath notes (RTE-111)
Connect hoses to rear of pump making sure the valves are closed. The blue valve controls the external flow rate and is connected to the output slot. Set up beaker in fume hood or the large water bath on the floor. Make sure open surfaces of the external bath are covered or water will evaporate, causing the bath level to drop below the safe level. Secure tubes so that the outlet hose from the bath is near the bottom in the bath and the intake hose is at the desired level. Turn on bath. A suction should be felt on the inlet hose and no water should be exiting outlet hose. Slowly open blue valve, otherwise beaker will overflow if opened too quickly. Try to find a balance such that the maximum flow rate is achieved without overflowing beaker. BE CAREFUL: Hose orientation affects suction and flow rate. Clamp sample in beaker in fume hood or place samples in test tube rack in large bath.
Press Next/Enter key for “SP” (set point). Use arrows to change set point. Once point is reached. Press Next/Enter twice to set temperature. Increments of at least 2.5C must be used for bath's cooling/heating system to come on.
To turn off, first close blue outlet valve. Then, turn off bath.
DO NOT TOUCH FLOW RATE VALVE UNLESS SUCTION IS ON OR ELSE THE BATH MAY OVERFLOW.
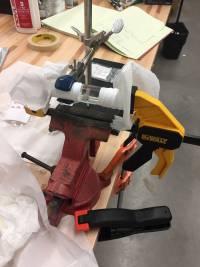
Gluing Samples Together
| Figure 1: |
|---|
 |
| Figure 2: |
|---|
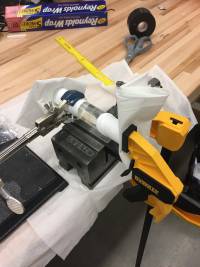 |
BC-600 optical cement (found in the fridge in lab 488) is used to glue longer samples together. Follow the instructions found here.
Painting Samples
Using EJ-510 white reflective paint, coat the outside of the sample with 3 coats, letting the paint dry in between coat. Then, coat with a black paint to block outside light.