Table of Contents
Latest Lab Safety Refresher Completed on Nov 2024
Laboratory Safety Procedures
General Laboratory Safety
- Open-toe footwear is not permitted. Open-toes shoes, for example sandles, will provide no protection should something fall on your feet, such as a screwdriver or dewar. Secondly, they will also provide no protection should you spill any cryogenic liquid on your feet. At least, with closed-toe shoes, there is a chance that the liquid will evaporate before reaching your skin, or in the worst case it buys you an extra few seconds to take your shoes off.
- Items of food and beverages are not permitted in the laboratory. Eating and drinking are prohibited.
- The first aid kit and eyewash solution are located on the shelf above and right of the sink at the front of the laboratory.
Safe Use of Solvents
We use methanol and isopropanol to clean components and equipment that we bring into clean areas of the laboratory. As a result, our laboratory generates very little chemical waste. As the exact cleaning procedure can vary depending on the item in question, the following is a general guide to the safe handling of these chemicals in our laboratory.
Before Handling Chemicals
- Material Safety Data Sheets (MSDS) for all the chemicals we use in the laboratory are located in a ring binder on the bookshelf. It is your responsibility to review these sheets and understand the hazards in question.
- Do not use a chemical until you have read the appropriate MSDS. If you have any questions, you should ask me.
- If a new chemical is introduced in this laboratory, I should be informed and if it is deemed acceptable, a MSDS should be placed in the ring binder. If a new chemical has been introduced, an announcement will be made by email.
- The MSDSs should be reviewed periodically to ensure you remain aware of the dangers.
Safe Handling of Solvents
- Goggles and latex gloves must be worn when handling solvents.
- The use of solvents is only permitted on the following work benches: beside the bookshelf, in front of the first aid kit and eyewash; beside the sink; and in front of the Intelligent Gas Handling (IGH) system. In addition, solvents may be used in the clean rooms. For those of you with desks in the laboratory, solvents may not be used at them or taken to them.
- Solvents must be stored in labelled containers. When not in use, these containers must be placed in tubs to contain any spills.
- When refilling solvent bottles, a tub must be used to contain spills.
- Very little solvent is required for cleaning, and should be sprayed onto a wipe. You should not be able to smell it.
Chemical Waste and Transportation
- We produce very little chemical waste. Although not strictly necessary, you are strongly encouraged to take the Chemical Waste Management online training module.
- The waste we do produce is stored within glass bottles underneath the sink. Each bottle should be labelled to indicate the amount and type of chemical that has been stored. New labels are available in the filing cabinet.
- The waste bottles sit in a tub to contain any waste in case of leaks.
- When transporting liquid chemicals or chemical waste, you must place the bottle(s) in a bucket to minimise contamination in case of leaks.
In Case of Accident
- If a chemical enters your eyes:
- Immediately grab the eyewash from the back shelf, twist off the top cap and pour it into your eyes.
- Use the entire bottle (32 fl. oz) to wash out your eyes. The bottle cannot and should not be reused. You will get soaked, but it is better to have wet clothes than lose an eye.
- You should wash out your eyes for at least 15 minutes. Fifteen minutes is longer than you think, so always be conservative.
- If irritation persists or your eyes are red, you must seek medical help. Even if irritation does not persist and your eyes look fine, you should seek medical help.
- If you wish to wash out your eyes further after you have exhausted the eyewash, you can use tap water from the sink or filtered water from the drinking fountain outside the laboratory.
- If there is a chemical spillage:
- Depending on the nature and extent of the spillage, you may decide to clean it up yourself. If so, grab plenty of clean wipes to soak up the liquid, and ensure that you are wearing gloves.
- If the extent of the spillage is significant, leave the laboratory immediately and call for help.
- All accidents must be reported to me, even if no injury was inflicted.
Safe Handling of Cryogenic Liquids
We use liquid nitrogen and liquid helium in our laboratory. Due to the low temperatures of these cryogenic liquids (77 K for liquid nitrogen and 4.2 K for liquid helium), the main potential injuries are cold burns and frostbite.
General Safety
- When using cryogenic liquids, you must always wear a face shield and the blue cryogenic gloves.
- When in the vicinity of cryogenic liquids, you must always wear a face shield.
- Liquid nitrogen dewars should only be moved with the dedicated trolley in the basement. They should only be transported in the service elevator. Take care not to agitate the contents of the dewar too much during transport to prevent excessive boil-off, which can cause cold burns and frostbite.
- Liquid helium dewars have wheels. They should be moved at a slow, gentle pace to prevent excessive boil-off, which can cause burns and frostbite.
- When disconnecting a liquid helium dewar from the recovery system, the valve leading to the pressure relief valve should be opened first. You may then close the gas supply valve. The pressure relief valve must remain open during transport and storage.
- The dewars must be stored upright.
Replacing the Liquid Nitrogen Dewar
A liquid nitrogen Dewar is used to fill the LN2 Cold Trap Bath. This Dewar should be refilled when it runs empty.
- A face shield should be worn during the entire procedure.
- Check that the Liquid and Vent valves on the empty liquid nitrogen Dewar are closed.
- Remove the L-shaped fill tube from the Dewar with a wrench.
- Use a Dewar trolley to move the Dewar out of the lab.
- Move the Dewar to the first floor using the service elevator, then take it the the Liquid Nitrogen Fill Room.
- Follow the instructions in the Fill Room to fill the Dewar.
- Bring the Dewar back to the lab and reconnect the fill tube.
Filling Liquid Nitrogen Cold Trap Bath
The liquid nitrogen cold traps are used to freeze out impurities in the He-3/He-4 mixture. During a run the bath must be filled at least once a day. There are two methods to accomplish this, depending on the transfer Dewar you use. A face shield and cryogenic gloves must be worn throughout the procedure.
- When using the large storage Dewar:
- Check that the L-shaped fill tube is connected to the Liquid port.
- Check that a rubber hose is attached to the L-shaped fill tube at the Dewar, and that the other end of the hose is attached to a tube entering the cold trap bath.
- Open the Liquid valve at the Dewar a fraction of a turn. You will hear nitrogen filling the bath.
- When the bath is full, close the Liquid valve at the Dewar. Make sure to wear a glove. Do not overtighten.
- When using a 5 l or 25 l transfer dewar:
- Place funnel in hole at the top of the cold trap bath.
- Pour liquid nitrogen slowly from transfer Dewar into cold trap bath.
- When the bath is full, stop pouring liquid nitrogen immediately.
- Remove funnel and replace stopper. Cover transfer dewar with its lid and place against wall so that it is out of the way.
Transfering Liquid Nitrogen from Dewar to Main Bath
Due to the high cost of liquid helium, we cool the cryostat from room temperature to 77 K with liquid nitrogen first. This is done by filling the main bath with liquid nitrogen. In addition to the possibility of receiving a cold burn or frostbite, you must be careful not to overpressurise the main bath, which can cause it to explode. A face shield and cryogenic gloves must be worn throughout the procedure.
- Bring full liquid nitrogen dewar down from basement using dedicated trolley and service elevator.
- Attach pipe to liquid supply on dewar.
- Hook up rubber hose between nitrogen transfer stick in main bath and pipe attached to liquid supply on dewar.
- Ensure that helium recovery hose has been removed from top of main bath to provide an exit for boil-off.
- Ensure that the rubber hose has plenty of space to contract safely without cracking. As the hose cools, it will contract and freeze solid. If poorly placed with little room for contraction, cracks can develop and liquid nitrogen can spill out.
- Open valve to liquid supply on dewar, slowly at first. This is to prevent the rubber hose from being shot out due to a high pressure.
- As the hose cools, it will freeze and contract. Once frozen, the valve to the liquid supply on the dewar can be opened further. Be careful not to open it too far that the hose starts to vinbrate violently. However, gentle vibration should be expected.
- Regularly check liquid level in main bath with nitrogen level meter. Once the main bath is full, close the liquid nitrogen supply, attach the one-way valve to the port for the helium recovery hose on the main bath, and wait for rubber hose to warm up.
- Once rubber hose has warmed up, disconnect it from the nitrogen transfer stick. Place a bung over the nitrogen transfer stick.
Blowing Out Liquid Nitrogen from Main Bath
The cryostat requires at least 12 hours to cool down to 77 K. The next stage of the cool down procedure is to replace the liquid nitrogen in the main bath with liquid helium. This is done by intially blowing out the liquid nitrogen with helium gas. Safety instructions for using helium gas from the cylinders is given in the Safe Handling of Gas Cylinders section below. A face shield and cryogenic gloves must be worn throughout the procedure.
- Place 25 l transfer dewar on the floor next to the cryostat. Place cardboard sheet under transfer dewar to prevent liquid nitrogen from spilling onto the floor, which can cause a hazard.
- Remove bung from nitrogen transfer stick and attach rubber hose. Place other end of rubber hose in transfer dewar.
- Ensure that the rubber hose has plenty of space to contract safely without cracking. As the hose cools, it will contract and freeze solid. If poorly placed with little room for contraction, cracks can develop and liquid nitrogen can spill out.
- Replace one-way valve on main bath with helium recovery hose. The helium gas will enter the main bath through here.
- Turn on helium gas supply using safety instruction given in the Safe Handling of Gas Cylinders section below. Keep pressure in line at around 350 mbar above atmosphere. It should not rise higher than 400 mbar to prevent overpressurisation.
- Liquid nitrogen will now be pushed out of the main bath and into the transfer dewar. Once process is complete, gas pressure will drop. Close valves leading from helium gas supply to main bath. Close valve on helium gas cylinder. Move dewar to a position such that it is out of the way. The recovered liquid nitrogen can be used to fill the cold traps as described above.
- Remove nitrogen transfer stick and rubber hose. Place bung on vacant port at the top of the main bath.
Transfering Liquid Helium from Dewar to Main Bath
The final transfer of cryogenic liquids during cool down is that of liquid helium to the main bath. In addition to the possibility of receiving a cold burn or frostbite, you must be careful not to overpressurise the main bath, which can cause it to explode. A face shield and cryogenic gloves must be worn throughout the procedure. Two people are required for this procedure.
- Unhook full liquid helium dewar from recovery system in basement as described in General Safety section above. Bring liquid helium dewar to the laboratory. Ensure pressure relief valve is open.
- Position dewar next to cryostat.
- Ensure that valves to helium recovery system are open to prevent overpressurising the main bath, which can cause an explosion.
- Insert cryostat half of transfer stick into the cryostat fill port slowly. Tighten o-ring connection to port. Screw cap loosely onto the end of the stick.
- Close pressure release valve on dewar and open liquid helium valve. Insert dewar half of helium transfer stick into liquid helium dewar slowly to cool it down: and inch every few seconds is a suitable speed.
- Once a plume forms on the other end of the transfer stick, insert that end into the end of the cryostat half of the transfer stick and tighten the o-ring connection.
- The helium recovery meter will start ticking over. Ensure it does not tick over too quickly, as this implies that the boil-off is too high and the main bath is overpressurised, which can cause an explosion. If this happens, raise the helium transfer stick a little higher in the dewar to reduce the pressure.
- Although the pressure can be increased by lowering the helium transfer stick in the dewar, you will reach the stage at which you must pressurise the dewar to continue the transfer. Refer to the Safe Handling of Gas Cylinders section below. When attaching the plastic gas hose to the gas supply on the dewar, open the gas supply valve first to ensure that no air is trapped when making the connection. Do not allow the pressure to increase beyond 3 psig. The 250L dewar has a self-heater which can be plugged into the wall; set it to 4 PSIG.
- When helium liquid level meter reads desired level, close gas supply valve on dewar to stop gas supply and open safety relief valve to release the pressure. Raise the dewar side of the transfer stick as much as possible and release some pressure from the dewar through the relief valve. Disconnect the two halves of the transfer stick and put the cap on the cryostat half. Be careful that the ends are not pointing at a person during the procedure. Remove dewar half of transfer stick from dewar. Remove cryostat half of stick from cryostat. Place stopper on vacant port at top of main bath. Place transfer stick parts on top of fridge rack.
- Return helium dewar to helium recovery line in basement.
Safe Handling of Gas Cylinders
We use pressurised nitrogen and helium gas cylinders in the laboratory for filling the Inner Vacuum Can (IVC) with heat exchange gas, leak checking and pressurising dewars for transfers of cryogenic liquids.
General Safety
- Material Safety Data Sheets (MSDS) for all the chemicals we use in the laboratory are located in a ring binder on the bookshelf. It is your responsibility to review these sheets and understand the hazards in question. The main danger from these gases is asphyxiation.
- Mishandled cylinders may rupture violently and can propel the cylinder to over 3/4 of a mile in height. Do not drop the cylinder and do not allow it to strike other cylinders violently.
- Cylinders must be secured at all times. In transit, use the green trolley and ensure that the chain lies securely across it. When attached to the gas lines in the laboratory, the cylinder must be securely tied to the wall with the belt provided. The belt should fit tightly.
- Valves must be closed when moving cylinders, even if the cylinder is empty. The protective valve caps should be screwed on using the entire thread.
- Cylinders must be stored in an upright position.
- Cylinders must be kept away from sources of heat.
Using Gas from a Cylinder
- Ensure final valve before your output is closed. This prevents any accidents should the pressure be too high.
- Open valve on cylinder.
- If required, open valves on regulator such that a sufficient pressure is fed into the gas lines. You may have to adjust the valve on the regulator. It is reverse thread.
- If you are happy with the pressure and are ready, open valve closest to the output.
- Close valve closest to the output and valve on cylinder after use.
Removing an Empty Cylinder
- Close valves on regulator and cylinder.
- Unscrew regulator from cylinder.
- Screw protective valve cap onto cylinder using entire thread.
- Manoeuvre cart as close as possible to cylinder.
- Detach belt holding cylinder to wall and gently move cart under cylinder.
- Securely strap cylinder into cart using chain and take it to the storage room in the basement. Place cylinder in area for empty cylinders and ensure that it is securely fastened to the wall before leaving.
Inserting a New Cylinder
- Bring cart as close as possible to full cylinder in basement storage room, detach it from the wall and securely strap it to the cart. Do not forget to tie the safety chain you just removed across the other cylinders in the room before leaving.
- Take cylinder to laboratory and place it as close as possible to the wall where it shall be installed.
- Undo chain and secure cylinder to wall with belt. Ensure cylinder is correctly aligned to allow regulator to be inserted.
- Unscrew protective valve cap and leave near cylinder, out of the way, for future use.
- Attach regulator to cylinder. Tighten with spanner. Ensure seal is tight to avoid leaks.
- Open valve on cylinder, ensuring that the other valves on the regulator are closed. The gauge on the regulator should show the pressure in the cylinder. There is no need to open the valve completely: a 1/2 turn will suffice.
- Close valve on cylinder if you are not going to use the contents immediately.
Radiation Safety
Several radioactive sources are used in the PAN 43 lab. Radiation dosimeter badges are provided to all lab personnel. Radiation badges are important for monitoring of not only the dose one receives, but also act as a continuous audit of our procedures for handling radioactive sources. Therefore, it is important that dosimeters are worn and the correct procedures for handling radioactive sources are followed at all times as stipulated here.
This laboratory possesses the following sealed sources:
| Isotope | Half-life | Emission | Serial No. | Activity [μCi] | Date Activity Taken |
|---|---|---|---|---|---|
| Am-241 | 432.6 y | alpha & gamma (59.5 keV 35.9%) | 1429-100-1 | 0.978 | 2010/05/01 |
| Am-241 | 432.6 y | alpha & gamma (59.5 keV 35.9%) | 1429-100-2 | 1.006 | 2010/05/01 |
| Am-241 | 432.6 y | alpha & gamma (59.5 keV 35.9%) | RPD-1 | 0.15 | 1963/10/10 |
| Am-241 | 432.6 y | alpha & gamma (59.5 keV 35.9%) | RPD-2 | 0.0003 | 1966/01/03 |
| Am-241 | 432.6 y | alpha & gamma (59.5 keV 35.9%) | 1507-17-1 | 1.067 | 2011/02/17 |
| Am-241 | 432.6 y | alpha & gamma (59.5 keV 35.9%) | 1507-17-2 | 1.075 | 2011/02/17 |
| Ba-133 | 10.51 y | beta- & gamma (356.0 keV 62.05%; 81.0 keV 34.06%; 276.4 keV 7.2%) | 1429-100-3 | 10.52 | 2010/05/01 |
| Cf-252 | 2.645 y | alpha & spontaneous fission (neutrons) | G9-748 | 10.0 | 2010/06/01 |
| Na-22 | 2.6027 y | beta+ & gamma (1.274 MeV 99.9%) | 1772-95 | 10.05 | 2015/1/1 |
| Y-88 | 106.616 d | beta+ & gamma (898.0 keV 93.7%; 1.836 MeV 99.2%) | 1647-50 | 101.7 | 2013/02/15 |
| Y-88 | 106.616 d | beta+ & gamma (898.0 keV 93.7%; 1.836 MeV 99.2%) | AF-1819 | 1000 | 2015/04/01 |
| Sb-124 | 60.20 d | beta- & gamma (602.7 keV 97.8%; 722.8 keV 10.8%; 1.691 MeV 47.6%) | AF-1820 | 1000 | 2015/04/01 |
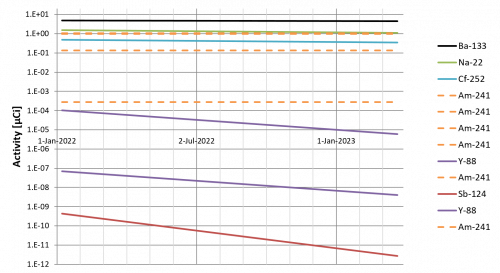 |
| click to expand |
In addition to the sources listed above, which are stored in the lab source safe, we make use of two higher activity sources: the PuBe neutron source and a Co-57 gamma source. The Co-57 source is still under the supervision of Kurt Wick and stored in Tate. To use this source we need to contact Kurt Wick and Kevin Booth to coordinate with their needs. The PuBe source is stored in the Howitzer in the PAN 443 dark room on the right. The paraffin-filled transport drum for the PuBe source is also in PAN 443. The key to remove the PuBe source from the Howitzer is stored in the source safe in the main PAN 43 lab.
| Isotope | Half-life | Emission | Serial No. | Activity [μCi] | Date Activity Taken |
|---|---|---|---|---|---|
| Co-57 | 270.9 d | gamma (122 keV, 136 keV) | 50,000 | 2011/08/22 | |
| PuBe | >70 y | neutrons via alpha-n reactions | M-674 | ≈1,000,000 (alpha), 53 (neutron), ~50 (gamma) | 1966/05/16 |
As of our first use of the Co-57 source in October 2016 its activity was a little over 400 μCi, 15 times higher than any of our other sources. As of March 2020 however the activity has fallen to 6 μCi, and thus no stronger than the other sources in our safe. The PuBe source is very active and is only used with substantial amounts of neutron moderating material. The 1 Ci activity reported above for the PuBe source refers to the alpha activity of the Pu-239 - none of the alpha radiation can escape the source housing. Only a small fraction of the alphas produce neutrons, resulting in a neutron activity of 53 μCi.
If you need access to the laboratory, you must complete the Radioactive Safety Orientation online training module. If you will be handling radioactive material, you must also complete the Radiation Safety for Radioactive Material Users online training module. Once the latter module has been completed, a dosimeter will be ordered for you.
Dosimeters
- If you do not possess a dosimeter, you are not permitted to handle radioactive sources.
- Only use the dosimeter that is assigned to you. Do not use somebody else's dosimeter.
- If you feel you will need a dosimeter, you may request one by emailing me.
- There are two types of dosimeters: body badges and finger badges.
- Dosimeters are stored in the filing cabinet marked “Radiation Badges”.
- Dosimeters are returned to radiation services at the end of every quarter. There is a charge for missing dosimeters. Do not take your dosimeter home with you. Return it to its rightful place before you leave for the day.
- Records of received doses are kept in a ring binder on the bookshelf.
Safe Handling of Radioactive Sources
- To reiterate, if you do not possess a dosimeter, you are not permitted to handle radioactive sources.
- Before handling radioactive sources, you must consider how to minimize your dose. You should think about your procedure such that you:
- Minimize the amount of time you handle the source. It may be better to pick up the source with your fingers rather than play around with tongs.
- Keep distance from the source. Emissions from radioisotopes obey the 1/r^2 rule.
- Keep your head away from the source. There is a good deal of soft tissue in your head, so resist the temptation to move your head closer to the source when fixing it somewhere in order to get a better look.
- Your finger and body badges must been worn during handling to monitor your exposure. The finger badge should be placed on the finger closest to the source, which is usually your index finger.
- All sources except PuBe are stored in a safe in the pump room. The combination to the safe is only known by those of you with dosimeters. Nobody else should have access.
- When removing a source from the safe in the pump room, it should be signed out in the log-book located within the safe, and a new location for the source should be specified. The log-book should remain in the safe. After moving the source from one location to another, or placing it back in the safe, the log-book should be updated to reflect this.
- If a source has been mounted on the tower, you must wear body and finger badges while performing the installation. Once the cryostat has been sealed with indium, the finger badge can be taken off. If Am-241 is the only source that has been installed, the body badge may also be removed.
- When not in use the PuBe source is stored in the shielded “howitzer” in the darkroom to the right rear of PAN 443. The howitzer must remain padlocked. No more than 3 lab personnel including the Supervisor (Matt Fritts) are allowed to remove the PuBe source. To transport the source to the lab (PAN 43), the padlocks are removed, the Lucite rod is pulled vertically upward, and the source and rod are then lowered into the paraffin-filled transport drum. Using a two-wheeled handcart the drum is brought to the basement using the freight elevator (wait until the freight elevator is unoccupied before using it to move the source). The drum is then wheeled into the PAN 43 lab. Returning the lab to storage is the reverse of this procedure.
Procedures after Source Installation
The requirements below apply if any radioactive source has been removed from its shielded storage and deployed in the laboratory, with the exception of Am-241 installed in a fully assembled cryostat.
- Persons without a dosimeter are not allowed in the lab.
- If you have a dosimeter you are permitted to be in the laboratory when a source is out of the safe. If the Cf-252 or PuBe source is in the lab and out of the safe, you will receive an email informing you of the fact, and you are encouraged to find an alternate work area.
- If the Co-57 source has been installed in the cryostat, you must erect at least one wall of the lead-polyethylene shield between the fridge and the work desks in the laboratory. Please see section on Safe Handling of Shielding Material below for safety instructions. You should not have direct line of sight to the cryostat from your desk. All access to the area around the cryostat should be kept to a minimum. If the Co-57 source has been installed in the cryostat you will receive an email informing of the fact. If you follow the safety procedures listed here, there is no need to find an alternate work area.
- If the Co-57 source is out of the safe but not installed in the cryostat, you must build a lead castle around it once you have it in place for your measurements. There are more than enough lead bricks in the laboratory to provide 3“ of shielding around the source. Please see section on Safe Handling of Shielding Material below for safety instructions.
- It is recommended to use tongs when handling the strong Co-57 source. However, this is best left to your judgment as moving the source a short distance with your fingers may result in a lower dose under some circumstances. If in doubt, use tongs.
- The Co-57 source is directional, with nearly 10 times greater activity in the direction of the flat circular surface. The source should never be pointed toward you or other personnel. If the source is in a lead castle, you can cover the opening of the castle with lead bricks if you need to step into the direction of the beam. When the source is in use in the lab for extended period, you should rope off the part of the lab that the beam is pointed toward as a reminder to personnel not to step into the beam.
- The PuBe source is only used in the lab with substantial amounts of neutron moderating material. One such use is within the full lead-polyethylene shield around the cryostat - the source is lowered by a rope into one of the corners of the shield. Another use is within the PuBe source's paraffin-filled transport barrel, with one wall of the lead-polyethylene shield between the source and the lab work areas. Only the lab supervisor and one or two other authorized persons may move the PuBe source out of and into its transport barrel.
- When a source is out of the safe, you must wear your body badges at all times while in the laboratory.
- The exception to the aforementioned rule is when the Am-241 sources have been installed in the cryostat. Their activity is low enough, and the cryostat provides suitable shielding, for there to be no need to monitor dosage.
- When a source other than Am-241 has been installed, a sign must be placed to warn the occupants of the laboratory. Care should be taken to provide adequate shielding if required with lead bricks, polyethylene slabs or both depending on the nature of the radiation.
Inventories, Leak Checks & Disposal of Radioactive Sources
Sealed source inventories and leak checks will be performed by the Radiation Protection Division (RPD) at the University of Minnesota. Sources are to be returned to the manufacturer upon disposal. Please contact me if you are concerned about the physical state of a source or would like to petition for its disposal.
Safe Handling of Shielding Material
To provide neutron and gamma shielding in the laboratory we use polyethylene and lead respectively. These materials are not only used to shield the detector from incident particles, but also to protect you from ionizing radiation from our sources. Care should be taken
- Lead is poisonous, and should never be handled without gloves. There are special black cut resistant gloves available in the laboratory, which must be worn when coming into contact with lead bricks or sheets. Your hands should be washed thoroughly after touching lead.
- The shielding is heavy, and should never be lifted with your back. Bend your legs and keep your back straight before lifting any polyethylene or lead sheets and lead bricks.
Inspection notes
2021 March 23:
- Should post basic instructions, what to do in case of emergency, on wall for transfers, handling sources
- Incident Reporting: if injured, should file a report to Julie Murphy
- Order eyewash, first aid kit
- Brightly colored duct tape for raised power cord behind fridge (trip hazard)